Category:Minecraft PE Maps
Viewed: 1443 - Published at: 6 years ago
Description:
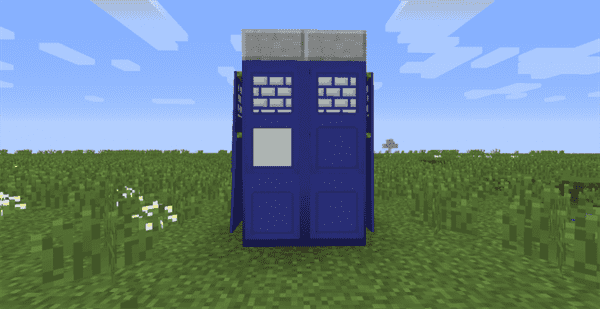
Hello there! It’s Rorny, and I have been working on my Minecraft TARDIS for a long time. Now, I have decided to share it with the MCPEDL community for you all to enjoy!
The TARDIS is a fictional spaceship and time machine originating from the British TV show Doctor Who. It is disguised as a small, blue police box but is actually bigger on the inside and can travel in time and space. This Minecraft map is an accurate recreation of the 11th Doctor’s second TARDIS and features its main console room (sometimes known as the Toyota or Neon console). On top of that, this TARDIS recreation actually works! It has many features such as coordinate travel and time manipulation!

Features:
- Coordinate Travel (Travel anywhere in the world!)
- Time Travel (Change time of day or night!)
- Weather Changing Capabilities
- Check TARDIS’ Coordinates
- Chunk Loader (Travel to and from unloaded chunks!)
- Save And Load Locations (4 location slots are available!)
- Artron Energy System! (TARDIS can run out of power and can be recharged!)
—
This is a guide on how to fly the Bedrock Edition TARDIS and how to deal with different problems you might encounter while using it. Read it carefully and follow all of the instructions given.
When you open the map, you will spawn inside of the TARDIS. Behind you, there is an iron door as well as a button on the side to open it. To exit the TARDIS, one must push the button and then walk out of the iron door until they are teleported outside. Once outside, it may take up to 3 seconds for the TARDIS to appear behind the player. In the very rare case that it does not (as a result of unlikely amounts of lag), the player may use one of the 64 Stattenheim Remotes in their inventory. The remote, when placed on the ground, summons a new TARDIS at your location. Note that the remote should only be used if the TARDIS does not appear behind you after you exit it!
The TARDIS can be entered by getting as close as possible to the repeating command block located on the back of the TARDIS exterior.
To access the TARDIS GUI, you must go to the underconsole of the TARDIS and locate the spruce-wooden-plank structure in the bottom-center. This structure should have 4 oak-wood buttons on it. Click on the wooden button facing the entrance/exit to get sent to the GUI.
The GUI, in this map, is actually a room containing various buttons and command blocks. The first thing you’ll notice in the “GUI” is an acacia-wood-button with a sign next to it that reads “Go To Page 2.” This button can be pushed to go to page 2 of the TARDIS GUI, which is used to save and load locations (I’ll come back to that later).
To the right of the acacia button, you will find two green command blocks with a sign between them that reads “Insert Coordinates.” As you might expect, these two command blocks are used to insert the coordinates that you want the TARDIS to travel to. To insert the coordinates you want to travel to, first click on the command block at the top. You will be met with the command: “/tickingarea add circle 690 63 690 1.” The first number (690) stands for the X axis, the second number (63) stands for the Y axis, the third number (690 again) stands for the Z axis, and the last number (1) doesn’t stand for anything. It’s just there, and its being there is of the utmost importance. What this all means is that the first 3 numbers stand for coordinates and can be changed to whatever coordinates you want to travel to. After you insert your desired coordinates, you MUST add a number “1” after them (if you don’t, the TARDIS will not land.).
Next, you must click on the command block at the bottom. You will be met with the command: “/tp @a[scores={exit=1}] 690 63 690.” As with the command block at the top, the first number (690) stands for the X axis, the second number (63) stands for the Y axis, and the third number (690 again) stands for the Z axis, This time, the coordinates are NOT followed by a number “1” and can. once again, be replaced with whatever coordinates you wish to travel to.
The coordinates you wish to travel to must be inserted into both the top AND the bottom command block, and they must be identical (unless you want the TARDIS not to work).
Next to the two green command blocks, there are two orange command blocks with buttons on them. As the signs above them suggest, the first one of the 2 orange command blocks is used to change the time of day/night, and the second one is used to change the weather. To change time, one must click on the first orange command block and replace the number at the end with any value they wish. This value is representative of the time of day/night you want to “travel” to. To initiate the change, one must push the stone button on the command block. To change the weather condition, one must click on the second orange command block and replace the second word in the command (the one that comes after the word “weather”) with the weather condition they want to “travel” to and the value at the end with the amount of time they want this weather condition to last for.
Now, let’s go back to the acacia button with the sign that reads “Go To Page 2” next to it. If you push this button, you will be taken to a room very similar to the one you were previously in. You will be faced with another acacia button with another sign that reads “Go To Page 1” next to it. This button can be pushed to return to the room you were in previously.
Next to this acacia button, you will see 4 signs that all read “Save” and “Load.” There is a stone button below and above each of these signs. Each column of buttons and a sign is a “Save/Load” slot. If you push the button on the top of a column you will save the current set location to that slot, and if you push the button at the bottom of the column you will load the location already stored within that slot.
To the right of your screen, you should see an indicator of the amount of Artron Energy your TARDIS currently has. Artron Energy is very important as it is the very thing that powers the TARDIS. Every time the TARDIS is flown, the amount of Artron Energy decreases by 200, and if the amount of Artron Energy dips below 200, the TARDIS can no longer be flown until the amount increases to 200 or more.
There are two ways to recharge the TARDIS. One is to place redstone blocks at the coordinates 24, 73, -6 (this is a location inside of the TARDIS). Each redstone block will increase the amount of Artron Energy by 50 (meaning one flight costs 4 redstone blocks).
Another way to recharge the TARDIS is to try to blow up TNT inside of it; the energy belonging to the explosives will be safely directed into the Artron capacitor. Each piece of TNT increases the amount of Artron Energy by 10.
—
If you like what you see, then you can go ahead and download this map to try it out for yourself. It would also be greatly appreciated if you shared this project, gave it an appropriate rating, and gave me some feedback about it. If you have any suggestions for additions/features, please leave a comment addressing those. Remember to credit me and leave a link to this post if you ever use this TARDIS publicly (for example in a server or YouTube video), and please refrain from reposting the map on other platforms. Thank you for your time!
Installation
Mcworld File: Open the Mcworld file obtained from the download link using the Minecraft application. A world called "TARDIS" should appear in your world list in-game.
ZIP File: Extract the ZIP file obtained from the download link and move the resulting folder into this location on your phone: 0/games/com.mojang/minecraftWorlds . Once this is done, a world called "TARDIS" should appear in your world list in-game.
![Find My Friends [Puzzle] [Minigame]](https://img.minecrafts.us/static/posts/lhO_6uF-ZS.jpg)
![SUPER NOOB DIFFICULTY [Command System]](https://img.minecrafts.us/static/posts/mnybz_OcS.png)

![New Year’s Countdown 2018 [Creation]](https://img.minecrafts.us/static/posts/HJ-YNtTo3L.jpg)
![Un-Pointless Map [UPDATED]](https://img.minecrafts.us/static/posts/wtc-MPg1sp.png)